How to increase traffic to your blog
How to add "Read More' into your post/blog
How a blog comment can bring 200+ unique visitors
How to put an Embedded Comment Form?
How to increase traffic to your blog
 Step 1
Write quality content, with the aim of being useful to a target audience. What do you know that is the answer to a person's question? Focus on catering that information to that person. Remember, what you are writing is for making their life easier. That said, you writing should be free of thick-headed hyperbole and obfuscation. Rather than refer your reader someplace else for their answers, bring the information and links they need to them. Make your post useful.
Step 2
If you are not writing something intended to be useful to someone else, say like something that is supposed to be funny, it had better be the best you could find online. As we all know, it is desperately hard to grab the attention of the modern internet junkie.
 Step 3
Choose the title of your post carefully. Titles and keywords two of the most important things in helping Google direct people to your content. The title should be a concise representation of the content.
Step 4
Include images with descriptive file names, for example rename a photo from "06052009_1453.jpg" to Man_Shot_by_Taser.jpg before you upload it. Descriptive outgoing and internal links also help you rank higher in Google's listings.
Step 5
Get a good hit counter. I use www.statcounter.com or www.histats.com and Google analytics. All are free, versatile, and awesome. StatCounter tracks where your visitors are coming from (geographically and link that brought them), what key words in what search engine they used to get to you, what they looked at on your site and how long, and finally where they exited you site. I use Google analytics for a broader look at my site, and I heard at a science fair that registering with them increases your page ranking.
Step 6
To implement StatCounter:Register at StatCounter.com. Click "Add New Project", enter in your blogs info and preferences, click "next" then "configure and install code". You will be asked if, when, and where you want your counter to be displayed as well as the colors etc. The next step asks what your web page editor is, Blogger/Blogspot is the default, and if you prefer HTML over XHTML... go for the XHTML. The next page has a nice graphical walk through for inserting the code on your page. The process for Google Analytics is almost exactly the same.
Step 7
Register your blog with Google's Webmaster's Tools by signing into blogger, clicking "Dashboard", then "Webmaster Tools" under tools and resources at the very bottom. You should see a list of you blogs and the option to "add" them. Do so, and then explore what Webmaster Tools can do for you!
Step 8
In Google's Webmaster Tools: Verify your site by adding meta tag which google provides you then add a sitemap of your blog under the Sitemaps tab. A sitemap will ensure that all of your content is properly crawled by Google's robots. By default, Blogger sets you up with a few news Feed links for your blog. These FEED URLs are yourblogname.blogspot.com/feeds/default, yourblogname.blogspot.com/atom.xml, and yourblogname.blogspot.com/rss.xml (as well as others). These same URLS make great site maps! So, under the Sitemap tab enter atom.xml and/or rss.xml into the text box by the "Submit Sitemap" button, and BINGO you are set!
Step 9
Register with and post your links on social link sharing sites like StumbleUpon. A large portion of my site's traffic comes from them. Here are some StumbleUpon tips: They reward you for using their toolbar, if you install it they will send more stumblers to the sites you discover. The amount of exposure the sites you submit get depends on many factors, like how many thumbs up it gets, it you used the toolbar, and the amount of stumbling you the submitter do yourself. Remember all of this is simply governed by mathematical equations... I have found that if I submit two links pointing to my own site in a row I get no visitors. However, if I do 50 stumbles (giving thumbs up to some sites along the way) then submit my own site I get tons of traffic from them! There are many other social link sharing sites to check out such as Digg, Fark, and Kirtsy plus too many more to list. Each have their own algorithms and nuances.
Step 10
Submit your feeds (yourblogname.blogspot.com/rss.xlm) to feed distributing sites. This page is an awesome resource for doing that. I am new to the news feed business.
Step 11
Add Sharing Buttons, such as AddThis!, StumbleUpon, Digg, and Facebook as a gadget in your side bar. You can get the code to add these buttons from each of their respective websites. It is one thing to do yourself favors by submitting your own link to StumbleUpon, but is so much better if a visiting reader does and giving them a convenient button makes it that much easier for them to do it!
Step 12
Follow and leave nice comments on other peoples blogs. Not only will being nice feel good, but every comment you make and every profile picture that shows up in someones "Followers" gadget is a link back to your own site.
How to add 'Read more' into your post/blog
Creating jump breaks in your blog posts can be easily done right from the post editor, without the need for any HTML changes. First, decide where in the post you want to create the jump break, and place your cursor in that position:

Once your mouse cursor is placed at the jump point, simply click the Insert Jump Break toolbar icon:


Once you are set on the jump break's location within the post, you are ready to publish your post. After publishing, you will notice that the Read More link is placed where you set the jump break: Note:For those using a customized third-party template, you will have to add a snippet of code to make Jump Breaks work. To do this, access your blog's Layout | Edit HTML tab, and first backup your template by clicking the Download Full Template link at the top of the page. This will download an XML version of your template which you can upload later at any time if you need to. After backing up your template, then click the Expand Widget Templates checkbox, and scan your HTML for the following snippet:
Once you've located that code, paste the following snippet directly below it:
After you've pasted in the code, click Save and then you're done!
How a blog comment can bring you 200+ Unique Visitors
There are great possibilities for driving good numbers of traffic to your blog by commenting on high-profile blogs. This article will explain how someone can get 200+ unique visitors from one comment in less than a week. Post a comment on ZenHabits which is one of the biggest productivity blogs with over 80,000 RSS subscribers. The article I commented on was How to Press the Reset Button On Your Life. This one comment brought me 239 unique visitors in less than 6 days after it was written. What to be aware of when blog commenting There are some things you must keep in mind to optimize your comment ability to drive great number of traffic to your blog. Optimize exposure for most clicks
* To drive traffic you must comment on a high-profile blog that normally has lots of readers / RSS subscribers / commenters.
* You must comment on the latest post as soon as possible after it is published. If you do that you will expose your comment to thousands of people who are going to read the post
* You must be an early commentator. The earlier you are, more exposure you are going to get. Not many people are going to read 50 comments from the same blog post. Aim to be in top 5 comments or so. Provide value to grab attention
* Don’t just comment for the sake of it. Only write a comment if you like the post and if you have something relevant and interesting to say.
* Write a quality comment that creates value and grabs the attention of readers. Add something substantial to your comment. Add your thoughts about the post, provide additional information from your personal experience or from a post you have on your blog. Brand your comments for long-term benefits
* Brand your comment by using same name, same avatar, same URL and same signature. This should be consistent with your social media profiles. Consistent marketing will build relationships to your blog. When people continue seeing your name repeated in comments sections of blogs and your comments are useful and interesting, it will make them wonder who the person writing is and will get them to click over to your blog. Now imagine if you do this consistently, and on several high-profile blogs at the same time. It could bring serious amount of traffic to your blog. DON'T FORGET TO DROP A LINK OF YOUR BLOG.
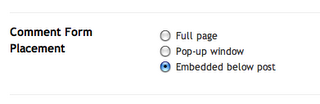
How to put an Embedded Comment Form?
Here's what an Embedded Comment Form looks like below your posts and other comments.
 If you don't have it in your blog yet but want to put it in your blog, follow these instructions:
1. Sign in to your blog from the Blogger web: http://www.blogger.com/.
2. Make sure you set the Enable Post Pages to 'Yes' in the Settings > Archiving tab.
3. Go to Settings > Comments tab for your blog. Look for the Comment Form Placement and click the Embedded below post button. Then save your settings.
 4. Go to Layout > Edit HTML and click Expand Widget Templates.
5. Search for this line in the code:
and below that line add the following line:
6. Save your template and you're done.